A WordPress contact page needs more than a visible form. Visitors must understand what the form is for, required fields should be limited to useful information, submissions must reach a monitored inbox, and the page should provide clear privacy and response expectations.
Contact Form 7 block
Add the plugin's form-selector block to a page, then choose the form you want to display.
Shortcode block
Copy the generated form shortcode and place it in a WordPress Shortcode block or compatible editor.
1. Plan the contact page
Decide what visitors should use the page for before creating fields. A small theme or publishing website may need only a name, email address, topic, and message. Adding unnecessary phone, address, company, or file-upload fields can reduce completion rates and collect information you do not need.
- Write a short introduction explaining which questions are appropriate.
- Tell visitors whether the form is for support, corrections, business inquiries, or general feedback.
- State a realistic response expectation only when the inbox is actively monitored.
- Do not request passwords, payment details, hosting credentials, or other sensitive information.
2. Install and activate Contact Form 7
- Back up the site. Create a current backup before changing plugins on a production website.
- Open the plugin installer. In the WordPress dashboard, go to Plugins > Add New Plugin.
- Search for Contact Form 7. Confirm the plugin name and developer before installing it.
- Install and activate the plugin. After activation, a Contact menu should appear in the dashboard.
- Keep the plugin maintained. Apply compatible security and maintenance updates after testing them against your site.
3. Create and customize the form
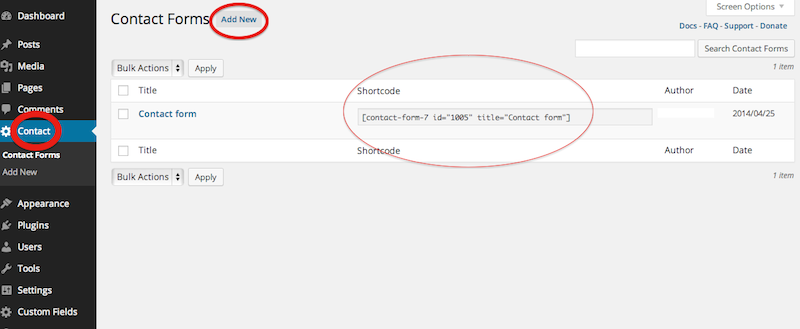
Open Contact > Contact Forms. You can edit the default form or choose Add New. Contact Form 7 uses form-tags to define fields and mail-tags to place submitted values into the email message.
A practical general-contact form often includes:
- Name: required only when you need to address the sender personally.
- Email: required so you can reply.
- Topic or subject: useful for routing and understanding the request.
- Message: required, with a clear label rather than placeholder-only instructions.
- Consent: add an acceptance field when your legal or privacy requirements call for one.
4. Configure the Mail tab correctly
The form can look perfect and still fail if its mail headers are misconfigured. In the form editor, open the Mail tab and review each field carefully.
- To: use an inbox that is actively monitored.
- From: use an address that belongs to the same domain as the website, such as
wordpress@yourdomain.com. Using the visitor's address here can trigger authentication or spoofing problems. - Additional headers: add the visitor's submitted email as the Reply-To value so clicking Reply addresses the sender.
- Subject and message body: include matching mail-tags for every value you need to receive.
After adding or renaming a form field, update the corresponding mail-tags in the Mail tab. A field can appear on the page yet be missing from delivered messages when its mail-tag is not included.
5. Add the form to a WordPress page
- Create or edit the page. Go to Pages > Add New Page or open the existing Contact page.
- Add an introduction. Explain the form's purpose and provide any essential expectations before the fields.
- Insert the form. Add the Contact Form 7 block and select the form. Alternatively, copy the generated shortcode and paste it into a Shortcode block.
- Preview the page. Check labels, field order, keyboard focus, required-field messages, and layout at mobile and desktop widths.
- Publish or update. Do not consider the page complete until a real test submission arrives successfully.
6. Test the complete submission path
Test as a visitor rather than only as a logged-in administrator. Submit the form from a private browser window and confirm every part of the workflow.
- The form displays and can be completed by keyboard and touch.
- Required and invalid-email messages are understandable.
- The success message appears only after a successful submission.
- The email arrives in the correct inbox with all expected fields.
- Replying addresses the visitor rather than the website mailbox.
- The message is not repeatedly sent to spam or rejected by the mail provider.
- The page still works after caching and optimization tools are enabled.
7. Add layered spam protection
Public forms attract automated and human spam. Contact Form 7 supports multiple protection methods, and using complementary controls is more effective than depending on one filter.
- Cloudflare Turnstile: Contact Form 7 provides a direct integration and currently recommends it as a CAPTCHA alternative.
- Akismet: can evaluate contact-form submissions when correctly configured.
- Disallowed list: can block messages containing specified terms or originating from specified IP addresses.
- Rate limiting or firewall rules: may help when one source sends repeated abusive requests.
Review false positives after enabling aggressive filters. A form that blocks legitimate inquiries without explanation is not functioning successfully.
8. Decide whether submissions should be stored
Contact Form 7 sends form data through email but does not store submitted messages by default. The plugin author provides Flamingo as an optional companion plugin that saves submissions in the WordPress database.
Database storage can protect against lost email, but it also creates a repository of personal information. Set an appropriate retention policy, restrict dashboard access, keep backups secure, and remove information when it is no longer needed.
Troubleshooting common problems
The form is visible, but no email arrives
Check the recipient address, same-domain From address, Reply-To header, and mail-tags. Test the host's outbound mail and review spam or quarantine folders. Saving messages with Flamingo can help confirm whether the submission reached WordPress even when email delivery failed.
New field values are blank in the email
Add the corresponding mail-tag to the Mail tab. Form-tags create visible fields; mail-tags determine which values appear in the delivered message.
The shortcode appears as plain text
Use the Contact Form 7 block or a WordPress Shortcode block. Do not paste the shortcode into a code block, paragraph configured to escape shortcodes, or a static HTML file that is not processed by WordPress.
The form receives too much spam
Enable more than one supported anti-spam measure, inspect logging where available, and avoid making every filter so strict that real visitors are blocked.
The layout looks different from the editor
The active theme controls much of the visible form styling. Inspect theme styles, caching, optimization, and custom CSS before editing plugin files. Keep custom styling in the theme or a site-specific customization layer so plugin updates do not overwrite it.
What changed from the original 2014 guide
The original article correctly described the basic workflow: install Contact Form 7, create a form, copy its shortcode, paste it into a page, and publish. The revised guide keeps that use case but adds the current form block, safer mail-header practices, layered spam controls, message storage, privacy considerations, and end-to-end testing.
Official references
Use current documentation to verify interface labels and configuration details before changing a production site.
Article status
Archived discussion
The original page included an inactive WordPress reply form but no preserved comments. The nonfunctional form has been removed so visitors are not asked to submit information to an endpoint that may not process it.
Questions, corrections, and feedback about this tutorial can be sent through the redesigned TDWP contact page.